
Users as Windows download new software, open email attachments, or test files from an unknown website. Windows Sandbox makes it possible for you to run potentially risky software without compromising the health of your Windows installation. It is a temporary and clean Windows installation.
In this article you will learn how to enable Windows Sandbox on Windows 11 and Windows 10. There are a few requirements that your PC must meet. Windows Sandbox is a lightweight, temporary, and isolated desktop environment that Microsoft’s uses to run and test unknown applications and tools. The Sandbox environment is isolated from your primary environment. The changes and files will be wiped once the Sandbox is closed. Microsoft Learn
What Is Windows Sandbox?
The Windows Sandbox feature installs new software, open files, and runs browse to run/test websites to your main Windows virtual temporary computer on your PC.
The main selling point of Windows Sandbox is that is absolutely temporary. This means that every time Windows Sandbox is opened there is an entirely fresh environment. Every time Windows Sandbox is closed this is all removed. This is particularly useful for a wide audience ranging from students, to developers, to office workers, to even those who just want to experience a safe way to run software.
For instance, imagine a case where a user downloads a website to a potentially untrustworthy tool. The user potentially has two choices. The most basic of the two is simply to avoid installing the software. However, a more intent user may want to know more about the tool. The way to run the a potentially malicious tool, all while staying safe, is simply to open a Windows Sandbox instance and run the tool to see how it behaves. The original Windows setup remains unchanged while the Sandbox remains expendable.
Benefits of Using Windows Sandbox
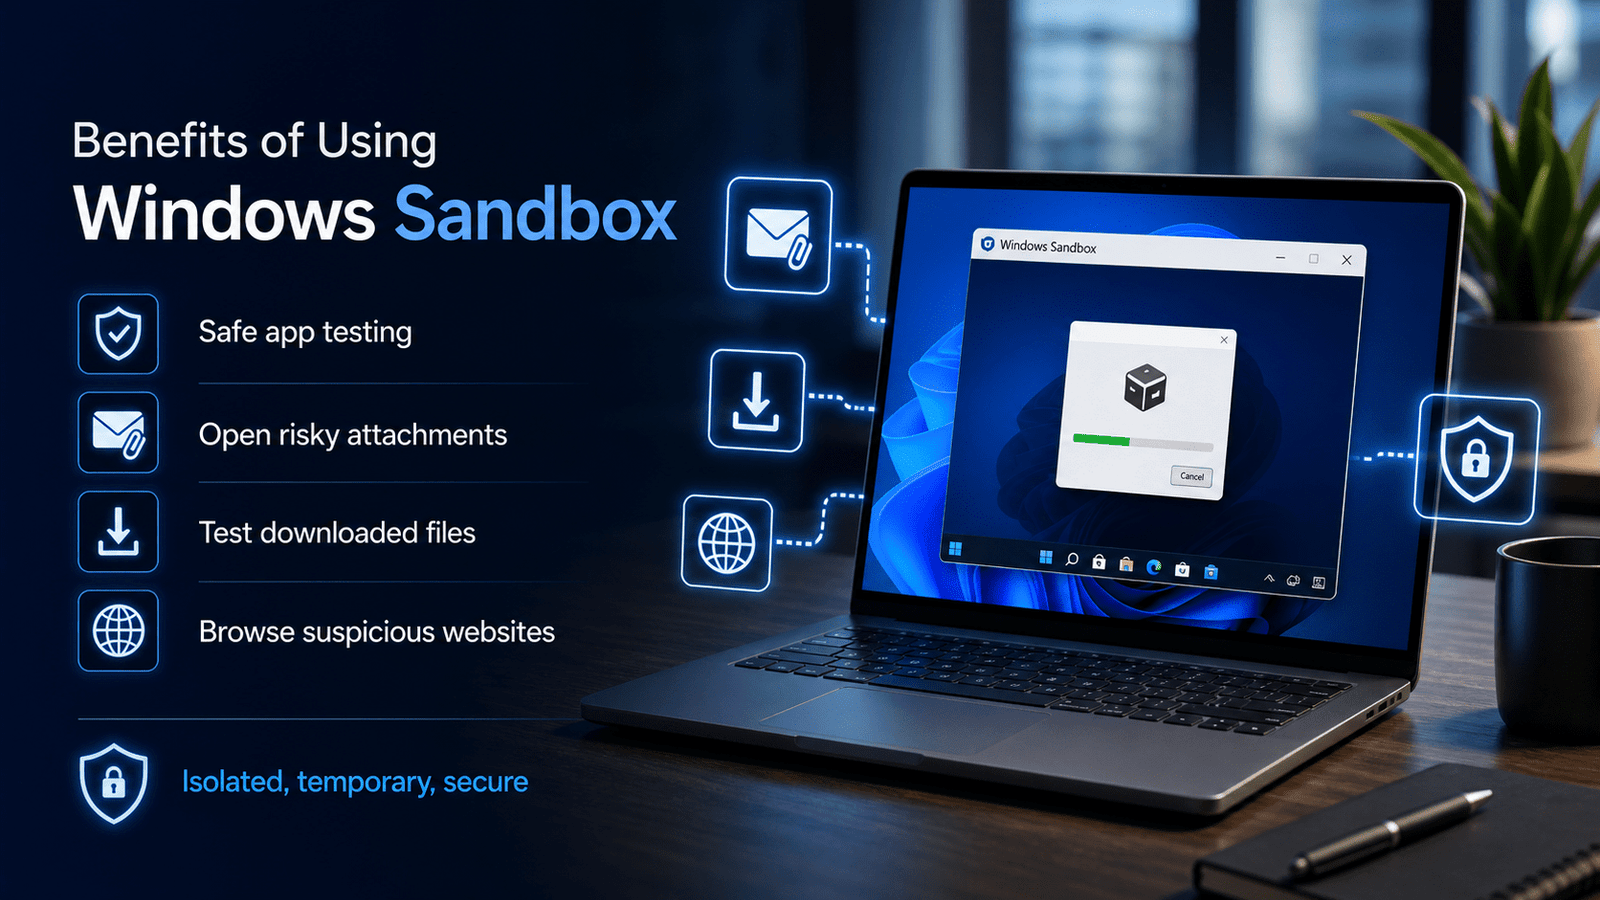
Windows Sandbox provides an absolutely essential feature that a standard virtual machine provides, but that does a great many virtual machines do not provide: a fully protected environment. When using a standard virtual machine it is necessary to run an entire extra operating system, and this comes at the cost of a great many resources, time and even tangibly more storage. Windows Sandbox does not have these constraints because it is included in many versions of Windows.
Here are some of the effects of running Windows Sandbox:
- The ability to run potentially dangerous software safely, as installation of the software would normally not be safe.
- The ability to run possibly dangerous email attachments safely.
- The ability to run potentially dangerous downloaded files safely.
- The ability to run potentially dangerous website safely.
- The ability to run potentially dangerous software safely, via the installation of browser extensions.
Windows Sandbox is supplemental software that works alongside antivirus software. It is recommended for anyone who deals with files of uncertain origins, and for those who tend to test applications and software.
Windows Sandbox Prerequisites

The first step is to enable Windows Sandbox is to verify your eligibility. Windows Sandbox is an integrated feature for Windows 11, and for Windows 10 version 1903 and later. It is important to check your BIOS to ensure that virtualization is enabled, and ensure that you meet the Windows Sandbox requirements including, 4 GB of RAM, 1 GB of available disk space, 2 cores of a CPU, and a 64-bit system. As a recommendation, improve your performance by increasing your RAM to 8 GB, using an SSD, and enabling Hyper-Threading on your CPU. [Microsoft Learn][2]
Windows Sandbox is only found integrated in specific Windows editions, namely, Windows Pro, Enterprise, Pro Education/SE, and Education editions. It is also important to note that Windows 10 Home does not support Windows Sandbox. Microsoft Learn
So, before you begin, make sure you have:
- Windows 11 Pro, Enterprise, or Education
- Windows 10 Pro, Enterprise, or Education, version 1903 or later
- 64-bit System
- Virtualization
- At least 4 GB RAM
- At least 1 GB available Storage
- At least 2 CPU Cores
If you are using Windows Home, you will not have the Windows Sandbox option available in Windows features. You will need a supported Windows edition in order to utilize this built-in feature.
Checking Your Windows Version
To check your Windows edition you can use the keyboard shortcut Windows + I to open Windows Settings. Click the System tab and select About. You can check your Windows edition within the Windows specifications. If you see editions like Windows 11 Pro, Windows 10 Pro, Enterprise, or Education, your computer can run Windows Sandbox.
You likely won’t be able to find Windows Sandbox if your edition is Windows Home.
Checking Virtualization Capability
The Windows Sandbox feature uses virtualization, which is the capability to use multiple isolated systems on your computer.
- To check if virtualization is active:
- Use Ctrl + Shift + Esc on your keyboard to open Task Manager.
- Find the Performance tab and click on it.
- Select CPU on the left.
- Virtualization should be on the right.
If you see The firmware has not joined then you will need to enable it through your UEFI firmware configuration.
The keys used for UEFI configuration will be depending on your computer model. The keys to look for would be F2, F10, Delete, or Esc. Follow the manufacturer instructions for additional configuration options.
Enabling Windows Sandbox through Windows Features
This option would be the quickest for most computers.
To use this option use the Start button and search for Turn Windows features on or off and simply select it.
- Scroll down to find an option for “Windows Sandbox.”
- Tick the checkbox including Windows Sandbox.
- Click “OK.” Windows will make the necessary changes, and your PC may restart.
- Click the Start Menu and search for “Windows Sandbox.” When the tool is launched, your PC will open a temporary Windows desktop.
Microsoft’s installation guidelines also mention to open “Turn Windows Features on or off,” check Windows Sandbox, click “OK,” and restart the PC if prompted. ([Microsoft Learn][2])
Steps to Enable Windows Sandbox from Windows Powershell
If you are a big fan of the command line, you can also turn on Windows Sandbox with PowerShell.
Right-click the Start button.
Select “Terminal Admin” or “Windows PowerShell Admin” and enter the command below.
Enable-WindowsOptionalFeature -FeatureName "Containers-DisposableClientVM" -All -OnlineYou should restart your PC if prompted. This is also a listing on Microsoft’s Learn documentation. ([Microsoft Learn][2])
After your PC reboots, you can search for Windows Sandbox from the Start Menu.
Steps to Launch Windows Sandbox after Enabling
As soon as Windows Sandbox is enabled, launching the tool is very easy.
- Click on the Start menu.
- Type “Windows Sandbox”
Click Windows Sandbox from your results. The program may take some time to fully launch, but once it’s done, you will see a new Windows desktop in a separate window. This is your Sandbox environment.
You can copy a file from your main PC to Sandbox. You can also use Microsoft Edge in Sandbox to download files to your device for testing. However, everything in Sandbox will be deleted when you quit.
Closing Windows Sandbox
If you try to close Windows Sandbox, you will get notified that everything will be deleted. If you confirm, everything from that Windows Sandbox will be removed. Any programs, files, apps, etc. that you downloaded, created, or added will be deleted.
This is what makes Windows Sandbox so special. You can download files from your main device to test with on Sandbox and the main device will not be affected.
According to Microsoft, when Windows Sandbox is closed, the content from Windows Sandbox is deleted and there will be no remnants of that Windows Sandbox on the main device. ([Microsoft Learn][3])
Windows Sandbox Security
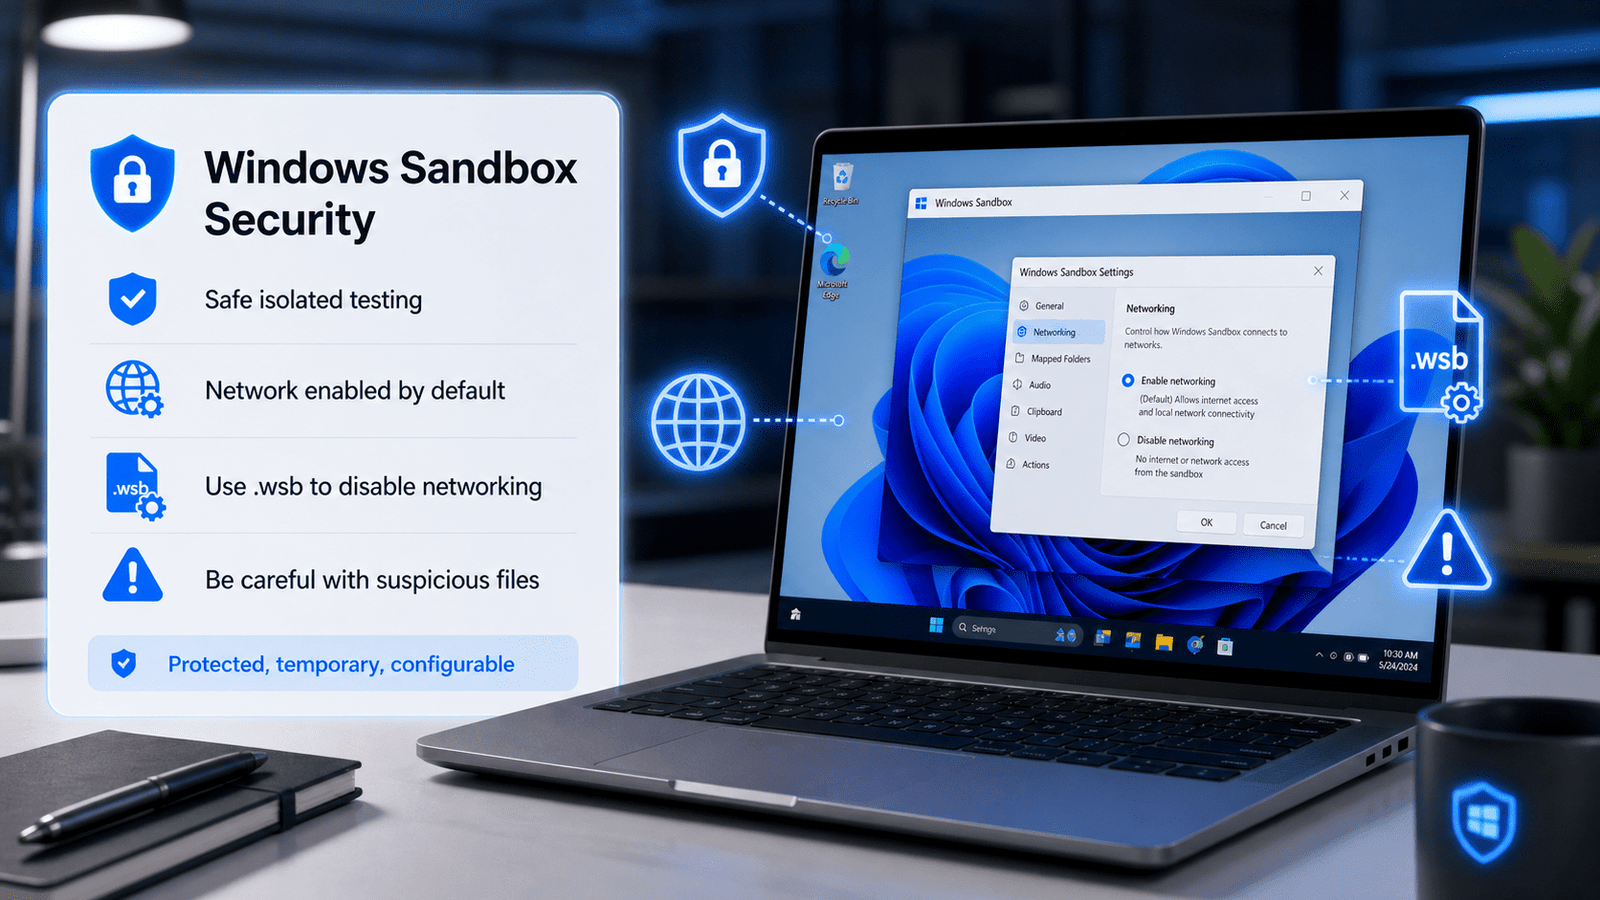
Windows Sandbox offers a safe environment for testing. It has built in protection that keeps everything that has been downloaded to Windows Sandbox from getting into the main Windows system. That being said, you should still be careful while using it.
For instance, networking mode is on by default for Windows Sandbox. Thus, Sandbox can browse the Internet and is susceptible to other network connections too. Applying to the Microsoft warning, the presence of networking mode leaves untrustworthy applications open to the internal network, but networking is disabled by a personalized Windows Sandbox configuration file. Microsoft Learn.
If a file seems trust questionable, Sandbox should only be utilized without network exposure. Users knowledgeable of the subject can design and implement a personalized .wsb configuration file to set the desired parameters for networking, clipboard, directories to be mapped, and several others.
Windows Sandbox Appearing To Be Missing
Very often, users looking for Windows Sandbox can’t locate it. Here are the main reasons:
- Your Windows Home edition is installed and is the operating system of the computer.
- In BIOS, the virtualization function has been set to disabled.
- The Windows version installed is very old.
- The computer does not comply with the minimum criteria for a computer.
- Windows installed components are misconfigured.
- There has been no Restart of the computer in any of the cases upon enabling the feature.
Begin with verifying your Windows edition. Then, verify the status of virtualization in Task Manager. Afterward, apply the pending System Updates from Microsoft and attempt to enable the functionality again.
Windows Sandbox Failing To Start: Common Fixes
Should you enable Windows Sandbox and is failing to start, the common fixes suggested by the community are:
- Restart the computer.
- Check and Ensure for virtualization.
- Apply Pending Updates.
- Disable and RE-Enable Windows Sandbox from Windows Features.
In Windows Terminal, run as administrator, then use the following command:
Disable-WindowsOptionalFeature -FeatureName "Containers-DisposableClientVM" -OnlineRestart your computer and then use the following command to enable the feature again:
Enable-WindowsOptionalFeature -FeatureName "Containers-DisposableClientVM" -All -OnlineWhile you are in an Administrative Command Prompt, you also are free to run these system repair commands:
sfc /scannowDISM /Online /Cleanup-Image /RestoreHealthAll of these commands may repair system files to ensure that they don’t obstruct the proper functioning of these Windows Features.
Can You Save Files Permanently in Windows Sandbox?
In short, no, you cannot. Windows Sandbox is a temporary space. It will delete files that were saved inside Sandbox as soon as you exit.
If you want to preserve a file, you will need to pull it back to your primary PC prior to closing the Sandbox window. This is generally allowed due to the provided clipboard access. Microsoft’s documentation states that clipboard access is a default setting. ([Microsoft Learn][3])
Mapped folders can also be created using a .wsb configuration file, but be cautious as this can give Sandbox, and therefore all Applications running inside of it, access to write to the mapped folder on the host.
Windows Sandbox vs Virtual Machine
Many users are curious if these two are the same. The answer is no, but the two virtualization options do share an overall goal.
A virtual machine functions as a complete stand-in for a physical computer. You’ll generally load one (or more) operating systems, allocate virtualized hardware, and maintain it as you would a standard PC. Virtual machines persist data across sessions and save state changes.
Windows Sandbox, on the other hand, is more ephemeral and less resource-intensive. It launches almost instantaneously, provides a Windows workspace for quick tasks, and vanishes the instant it’s closed. Windows Sandbox is better for quick, one-off tasks, whereas a virtual machine is more suitable for long-term testing, development, or spinning up a new OS.
For students and the average Windows user, Windows Sandbox is much simpler to use than the more complicated process that is creating and configuring a virtual machine.
Tips for Using Windows Sandbox
Here are some strategies for using Windows Sandbox in a healthy and safe way.
- If you absolutely must, don’t log into any of your accounts from the sandbox.
- When handling untrustworthy files, refrain from entering any sensitive from passwords.
- Once you have completed testing, make sure that sandbox is closed.
- If you have any files that are important to you, make sure they are saved to your host before you close the sandbox.
- Only map important folders to the sandbox and give them write access if you trust the app.
- Don’t forget to operate Windows confidently.
- It is necessary to use some sort of antivirus on your virtual sandbox as well.
Windows Sandbox is extremely powerful, but comment sense is necessary when you are using it. It does reduce risk, but it is in no way invedible to harmful files when you use it.
Who is Windows Sandbox Useful For?
Windows Sandbox is something that is useful to almost every user type.
Students can use Windows Sandbox to test software for their school assignments or IT practice. Developers can test their apps without the fear of compromising their local environment. Teachers can use it for demonstrations. Office users can open potentially harmful attachments more safely. Tech students can play around with the Windows settings without harming the underlying configuration of their systems.
It can be especially useful for people who frequently download various tools from the internet. As opposed to installing every single tool on the system, users can just try it out on Windows Sandbox first.
Important Note for Windows 11 24H2 Users
Microsoft says that starting with Windows 11, 24H2, some installed applications like the Calculator, Photos, Notepad, and Terminal, will not be currently available in Windows Sandbox, however, support for these applications is coming. ([Microsoft Learn][2])
So, if you start Windows Sandbox using Windows 11 24H2 and some of the aforementioned inbuilt apps are missing, this is possibly not a problem with your computer. This is a behavior of Windows Sandbox as stated by Microsoft.
Conclusion
Now you know the steps to use Windows Sandbox on Windows 11 and 10. The easiest method is to search for Turn Windows features on or off, and then check the Windows Sandbox box, click OK, and restart your computer. You can also do a couple of things with this command from a PowerShell to turn Windows Sandbox on.
Windows Sandbox is a helpful security feature for Windows. You can test applications/files and even browse risky websites without your computer being compromised. Sandbox is easy to use and is built into major Windows operating systems. The important thing to notice is that once you close Sandbox, everything is lost. Be sure to move everything you need out of the Sandbox before you close everything out.
If your computer can do it, you should turn on Windows Sandbox. It is a great way to keep your computer safe while giving the ability to test untrusted applications.

