
Windows built the Disk Management app to help users manage the hard disk partition in their computer and external storage devices. You can use Disk Management to create a new partition, format a partition, delete a partition, and for other management tasks regarding the disk drives on your computer. This guide explains how to access Disk Management quickly on your Windows computer and how to make the best of its functionality.
What is Disk Management?
Before getting into the ways you can access Disk Management, we should explain what that is. Windows Disk Management is a default disk management utility that can be used by the users on their computer to manage their storage devices and perform disk-related functions. Disk Management can be used to:
- Create, delete and format partitions.
- Resize partitions, or extend one to occupy unallocated space.
- Assign, or re-assign a particular letter to a drive.
- Change the file-system of a drive (e.g. FAT32 to NTFS).
- See the status of all the drives in the computer.
Disc Management is crucial for every Windows computer user whether you use a system for a basic purpose, or very advanced jobs.
Why Should You Use Disk Management?
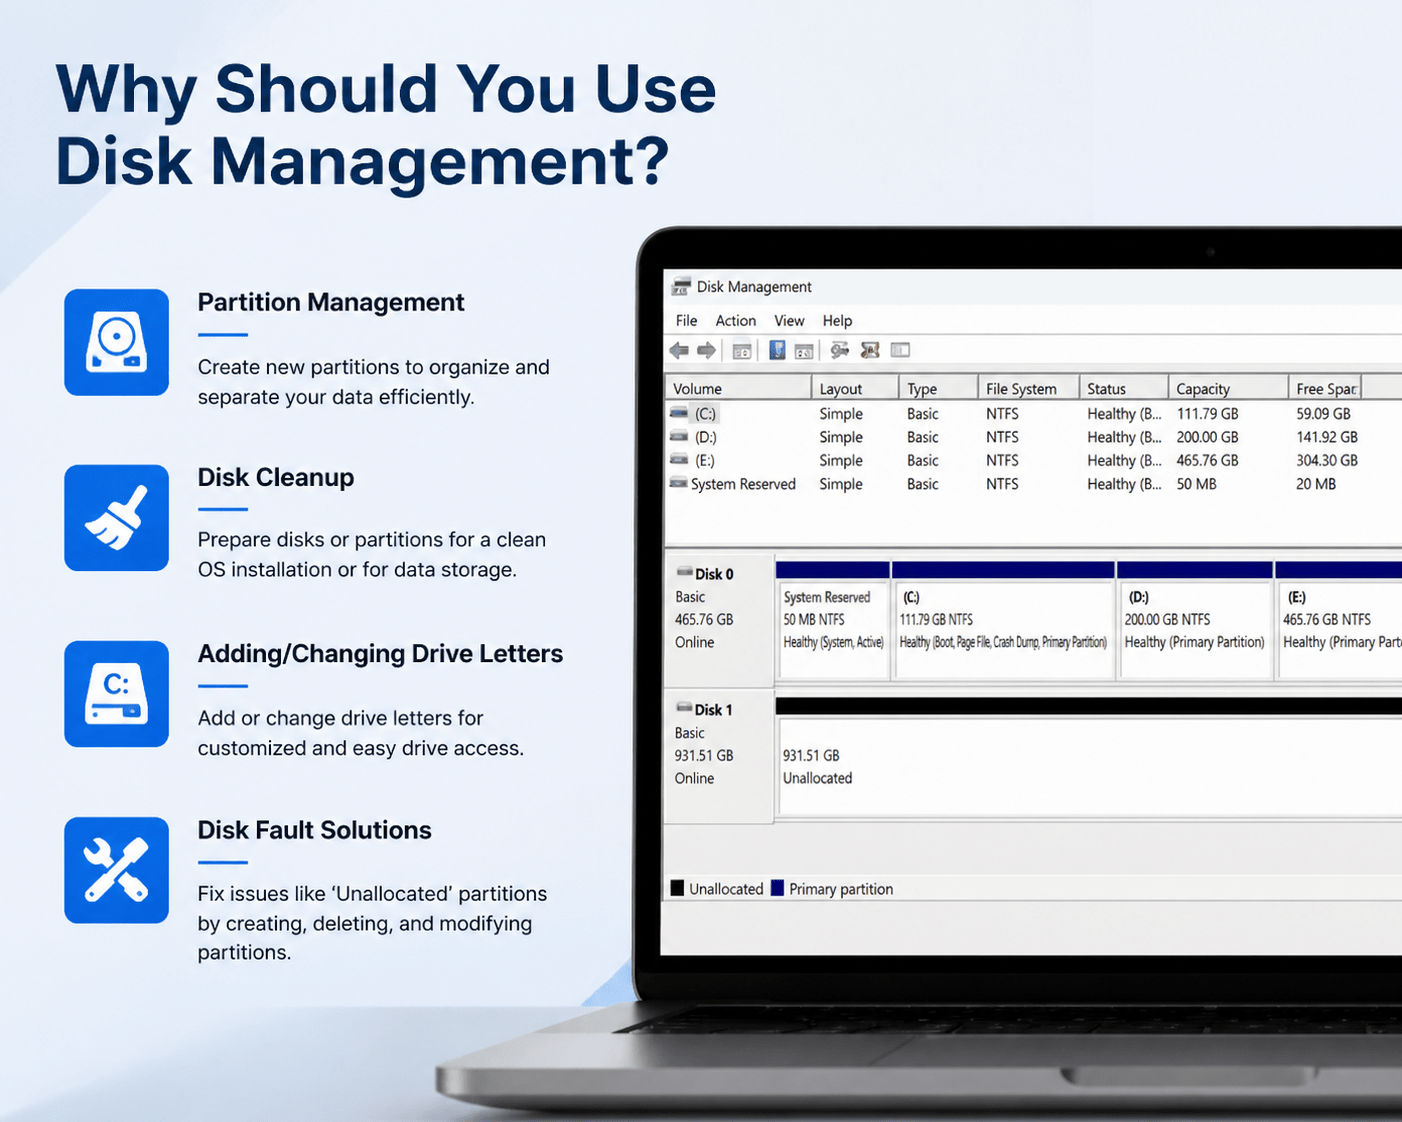
There can be many reasons for opening Disk Management in Windows:
- Partition Management: You might need to create a new partition on your storage to separate and organize your data better. For instance, you can separate your system disk from your personal storage and have a partition for your backups.
- Disk Cleanup: There are two main times disk cleanup can be used. When a disk or partition is to be used for a clean install of an operating system, disk cleanup will prepare the partition for the new operating system by erasing old data. Disk cleanup can also be used to prepare a disk or partition intended for data storage so the system can read and write data to the partition.
- Adding/Changing Drive Letters: Disk Management can be used to add or change the drive letters for the partitioned storage devices. This is helpful for the customization of drive letters assigned to storage.
- Disk Fault Solutions: Due to anomalies, partitions can appear as ‘Unallocated’. This is another issue that arises that the Disk Management can solve by creating/deleting and modifying disk partitions.
Accessing Disk Management in Windows
Disk Management is one of the more useful programs in Windows for managing software. Before we can go into the management options that Disk Management provides, let me show you how to access it. There are a number of methods to open Disk Management based on the version of Windows you are using.
Method 1: Accessing from Start Menu
1. Open Start Menu (a Windows symbol in the bottom left of the screen)
2. Type ‘disk management‘
3. From the menu, click on ‘Create and format hard disk partitions’. Disk Management will open.
Method 2: Accessing through Run Command
1. Press the Windows Key and R Key simultaneously on your keyboard
2. Type ‘diskmgmt.msc’ and hit the Enter Key or click OK.
3. Disk Management will open on its own.
Method 3: Using Control Panel
1. Launch the Control Panel by entering it in the search inquiry, and select the application from the results.
2. Go to ‘System and Security‘ > ‘Administrative Tools’.
3. In the Administrative Tools dialog, select and open ‘Computer Management’.
4. In the left side panel, select ‘Disk Management‘ in the ‘Storage’ section.
Method 4: Using Command Prompt
1. Using the shortcut Windows + X, choose ‘Command Prompt (Admin)‘ to run it with administrative privileges.
2. Enter ‘diskmgmt.msc‘ and press Enter.
3. With this command, the Disk Management application will be launched in a new dialog.
Method 5: Using PowerShell
1. Again, press Windows + X, but from the menu, choose ‘Windows PowerShell (Admin)’.
2. In the PowerShell console, enter ‘diskmgmt.msc’ and press Enter.
3. With this, the Disk Management application will be launched.
Method 6: Through the Settings Menu (Windows 10 and 11)
1. The Settings menu can be opened via the gear icon from your Start Menu.
2. Select ‘System’ > ‘Storage’.
3. In the Storage menu select ‘Advanced storage settings’.
4. Click ‘Disk Management’ from the options provided.
Navigating the Disk Management Interface
After opening Disk Management, the first thing you’ll see is a window that has a listing of all disks and disk partitions on your PC. The window will have two areas, or two panes, that are displayed horizontally:
- The upper pane of the window will list all of the hard drives or disks that are currently connected to the PC, partitions of those drives, and the statuses of the drives/partitions which can be as follows (Healthy, Unallocated, and so forth).
- Bottom Pane: Each selected disk’s volume, file system (like NTFS, FAT32), and size display here. RM provides the option to format or extend the partition by right-clicking in this pane.
Disk Management helps you understand the layout of your disks, allowing you to make better decisions regarding storage management.
The main features of Disk Management
Let’s explore the supporting features that Disk Management provides to assist in disk management.
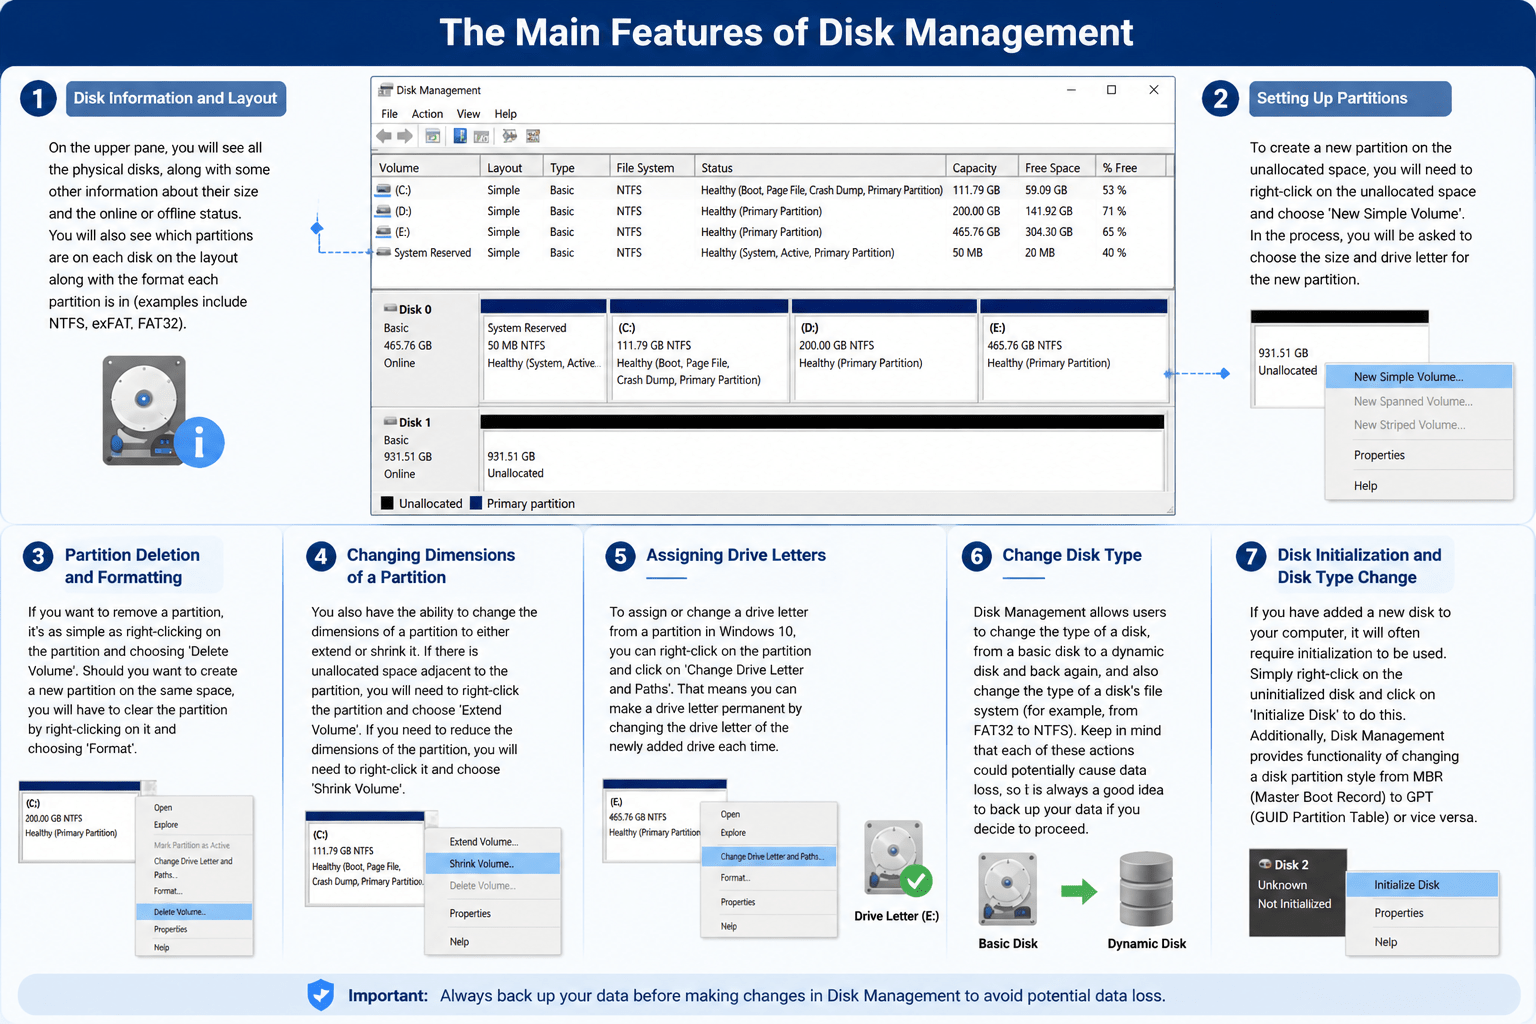
1. Disk Information and Layout
On the upper pane, you will see all the physical disks, along with some other information about their size and the online or offline status. You will also see which partitions are on each disk on the layout along with the format each partition is in (examples include NTFS, exFAT, FAT32).
2. Setting Up Partitions
To create a new partition on the unallocated space, you will need to right-click on the unallocated space and choose ‘New Simple Volume’. In the process, you will be asked to choose the size and drive letter for the new partition.
3. Partition Deletion and Formatting
If you want to remove a partition, it’s as simple as right-clicking on the partition and choosing ‘Delete Volume’. Should you want to create a new partition on the same space, you will have to clear the partition by right-clicking on it and choosing ‘Format’.
4. Changing Dimensions of a Partition
You also have the ability to change the dimensions of a partition to either extend or shrink it. If there is unallocated space adjacent to the partition, you will need to right-click the partition and choose ‘Extend Volume’. If you need to reduce the dimensions of the partition, you will need to right-click it and choose ‘Shrink Volume’.
5. Assigning Drive Letters
To assign or change a drive letter from a partition in Windows 10, you can right-click on the partition and click on ‘Change Drive Letter and Paths’. That means you can make a drive letter permanent by changing the drive letter of the newly added drive each time.
6. Change Disk Type
Disk Management allows users to change the type of a disk, from a basic disk to a dynamic disk and back again, and also change the type of a disk’s file system (for example, from FAT32 to NTFS). Keep in mind that each of these actions could potentially cause data loss, so it is always a good idea to back up your data if you decide to proceed.
7. Disk Initialization and Disk Type Change
If you have added a new disk to your computer, it will often require initialization to be used. Simply right-click on the uninitialized disk and click on ‘Initialize Disk’ to do this. Additionally, Disk Management provides functionality of changing a disk partition style from MBR (Master Boot Record) to GPT (GUID Partition Table) or vice versa.
Issues with Disk Management and their Solutions

Disk Management is a very handy application. However, users do face certain issues that can be classified. Here are some of the categorized issues regarding Disk Management and the suggested steps to solve these issues:
1. Installation of Disk is Not Completed
If you have added a new disk to Disk Management, ensure that it is completely connected. If this is not the case, you can try a different device, or restart your computer to check if that helps.
2. Space is Not Allocated
Space is not allocated appears to be showing when a partition has been deleted or has not been formatted recently. This provided space can be made by right-clicking on that space and selecting ‘New Simple Volume’.
3. Unable to Extend Volume
To extend a partition, there has to be unallocated space present next to a partition. If there is still no unallocated space, you will need to reduce the size of other partitions.
4. Disk Offline
A disk can also appear to be Offline in Disk Management at times. All you need to do is, from the right-click, select ‘Online’.
Conclusion
Learning how to open Disk Management allows you to control your system’s Disk partitions, at will. Whether you need to shrink partitions, format partitions, or perform a Disk health test we can highly assure you Disk Management is the software for use. With a little effort in mastering the tool, you’ll end up with a well-organized system and steady performance.
Just remember that with the changes mentioned above, you need to do backups beforehand to remove the risks of keeping your important data unprotected. Although being a very powerful tool, this one also needs to be used with a lot of care.

