
Are you looking to install Windows 11? Improve computer security? Check to see if your ASUS computer is up to date with modern standards? If so, one option you need to know about is TPM 2.0. Many ASUS users search how to enable TPM 2.0 in BIOS because the option is often hidden in the BIOS settings, and how it looks differs by CPU or motherboard.
Here’s the good news, not much is usually needed to enable TPM 2.0 on ASUS motherboards. In most cases, no additional hardware such as a TPM module is taken into account if your CPU or motherboard already includes a firmware TPM. On most ASUS boards, users have Intel PTT on Intel CPUs or AMD FTPM on AMD CPUs.
This guide covers how to enable TPM 2.0 in BIOS on ASUS motherboards and how to confirm it’s supported, settings with this capability, and what to do if you don’t see them. I cater to BIOS newbies and those with a basic understanding, so regardless, you don’t need to have a high understanding of BIOS in order to understand the instructions outlined below.
What is TPM 2.0?
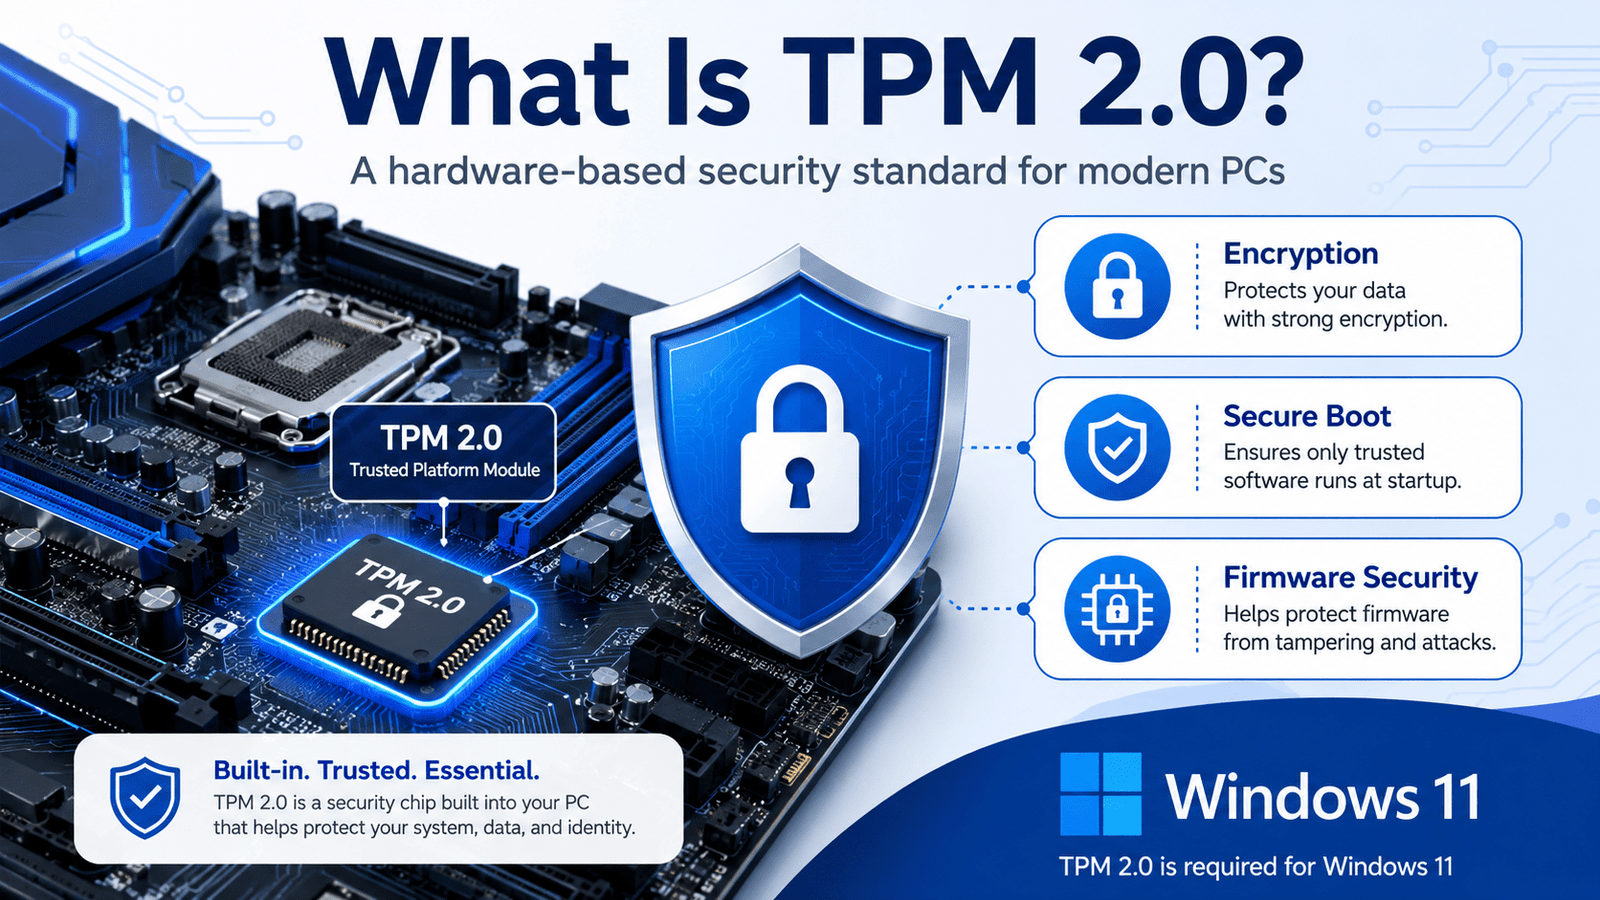
TPM is short for Trusted Platform Module and is a security standard used to assist in the protection of sensitive platform security. TPM can be used to fortify hardware that is used to create and store cryptographic keys in a way that makes it more difficult for an unauthorized adversary to attack them.
The latest and most widely used Trusted Platform Module (TPM) version today is TPM 2.0. TPM 2.0 is very important to ASUS users because a Windows 11 installation requires it.
TPM increases security and allows users to keep data secure through features such as:
- BitLocker: allows disk security
- Windows Hello: provides secure data access through a password
- Secure Boot: prevents unauthorized data access
- Firmware-based attack protection
- Credential storage: keeps keys safe from access
TPM is most recognized as a hardware chip that is part of the system’s motherboard. This is true, because older ASUS motherboards required you to attach a hardware module, but newer ASUS motherboards have built-in firmware support. This means the motherboard’s CPU and BIOS have the required support TPM.
TPM 2.0 is Important for ASUS Motherboards
There are two primary reasons why Windows 11 and security make TPM 2.0 important on ASUS Motherboards:
1. Windows 11 Requirement
Microsoft uses TPM 2.0 as a standard to support Windows 11 operating system. Users risk losing support for Windows 11 even on newer hardware motherboards and devices, because of hardware restrictions on TPM enabled BIOS.
2. Enhanced Security
TPM provides hardware-level security. It protects against unauthorized access to your data and keeps it safe from prying eyes. It provides better protection and access to stored encrypted keys and data than traditional software.
3. Simple BIOS Activation
It may be as simple as a switch that users must pull. Many ASUS boards have a simple switch in the BIOS. For systems using, the switch is often called PTT. For systems using AMD, the switch is often called fTPM.
Be Sure to Note Carefully Before You Proceed
Make sure you understand the following before making any changes to the BIOS:
- Your motherboard must support TPM 2.0
- Your processor should support Intel PTT or AMD fTPM if you have no discrete TPM module
- The construction of the BIOS may differ in small ways from the other ASUS motherboards
- Back up anything you need. Changes to settings in the BIOS could be damaging, and data changes could be lost if the builders choose to update the BIOS
- In cases where the TPM option is present, you may have to perform an update to the BIOS to be able to see the option
In the majority of cases, it will always be safe to select the option. It is best to be cautious and only select the things to the extent you know and understand the consequences of so doing.
Confirming the State of TPM 2.0
Before you jump to the conclusion that you will need to learn how to enable TPM 2.0 in BIOS for ASUS Motherboards, you should be sure to determine the current state of the feature. It may, in fact, be defaulted to activated.
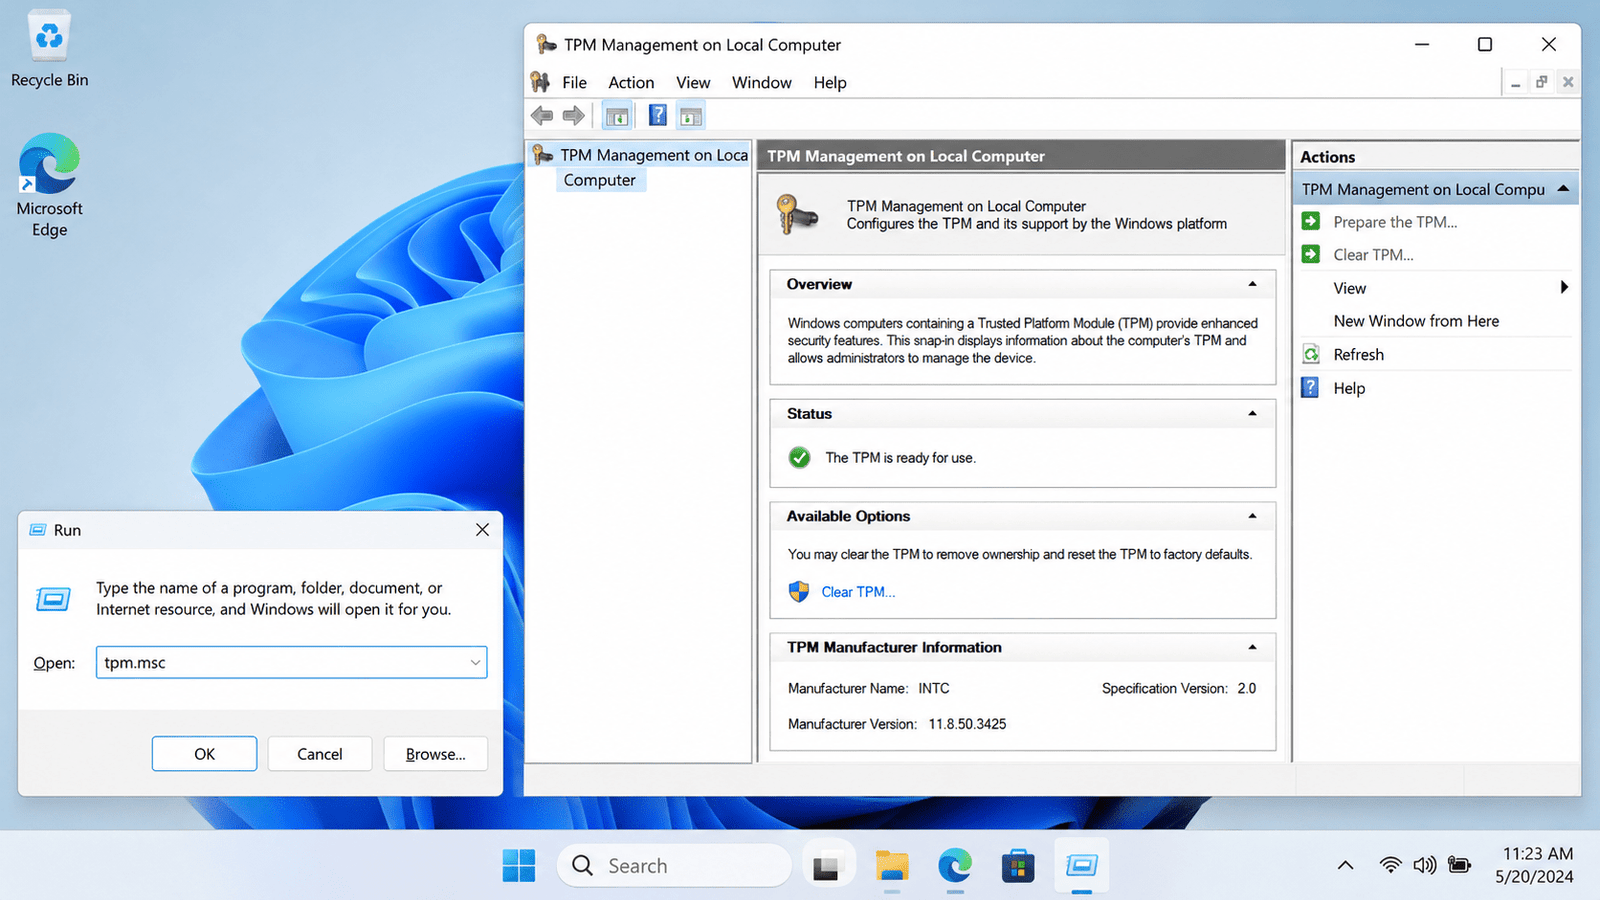
Use the TPM Management Tool
- Use Win + R
- Set the command to tpm.msc
- Confirm with Enter
- You will see a pop up window.
The following details need to be checked:
- Status: The TPM is ready for use
- Specification Version: 2.0
Should you confirm both of these items in the prior window, TPM 2.0 is then ready to be used on your system.
Windows Security Check
Your Windows Security settings in your system settings need to be checked to confirm that the TPM in your system has both the TPM function and that functionality is enabled.
Depending on the version of the Windows Security Verification, you may need to select either Update & Security and Privacy sections or just one of the two.
- Open the Windows Security
- Select the option Device Security
- Confirm that the Security processor is available
- Confirm that your system contains the TPM function and that specification is 2.0
Use Windows 11 PC Health Check
If you are trying to get Windows 11 with Microsoft PC Health Check tool, you will see whether your PC has the requirements.
How to Enable TPM 2.0 in BIOS ASUS
Now it’s time to get to the fun part. ASUS boards can change in wording, but they don’t differ much in steps.
Step 1: Enter the ASUS BIOS

The first thing to do is restart your PC. As it is booting, you are going to start repeatedly clicking the delete key or F2. At least one of these should open up your BIOS.
If you see Windows pop up instead of your BIOS, restart and do it again. Sometimes a quick press of the button works.
Most ASUS PCs open up BIOS in an EZ Mode that’s a simplified interface. If you want to see the rest of the settings, you can press F7 and it will open up in Advanced Mode.
Step 2: Go to Advanced Settings
Once you are in BIOS and in Advanced Mode, you can put your mouse on the top of the screen. You will see a tab named Advanced.
From there, you should see your TPM-related settings in one of these areas:
- Advanced > PCH-FW Configuration
- Advanced > Trusted Computing
- Advanced > AMD FTPM Configuration
- Advanced > Intel Platform Trust Technology
Most of these online tutorials can’t capture your screen perfectly. ASUS uses some different names across different generations of product lines, but the TPM option should typically be somewhere in or around your Security, Advanced, or Firmware settings.
Step 3: Access Via Intel ASUS Systems
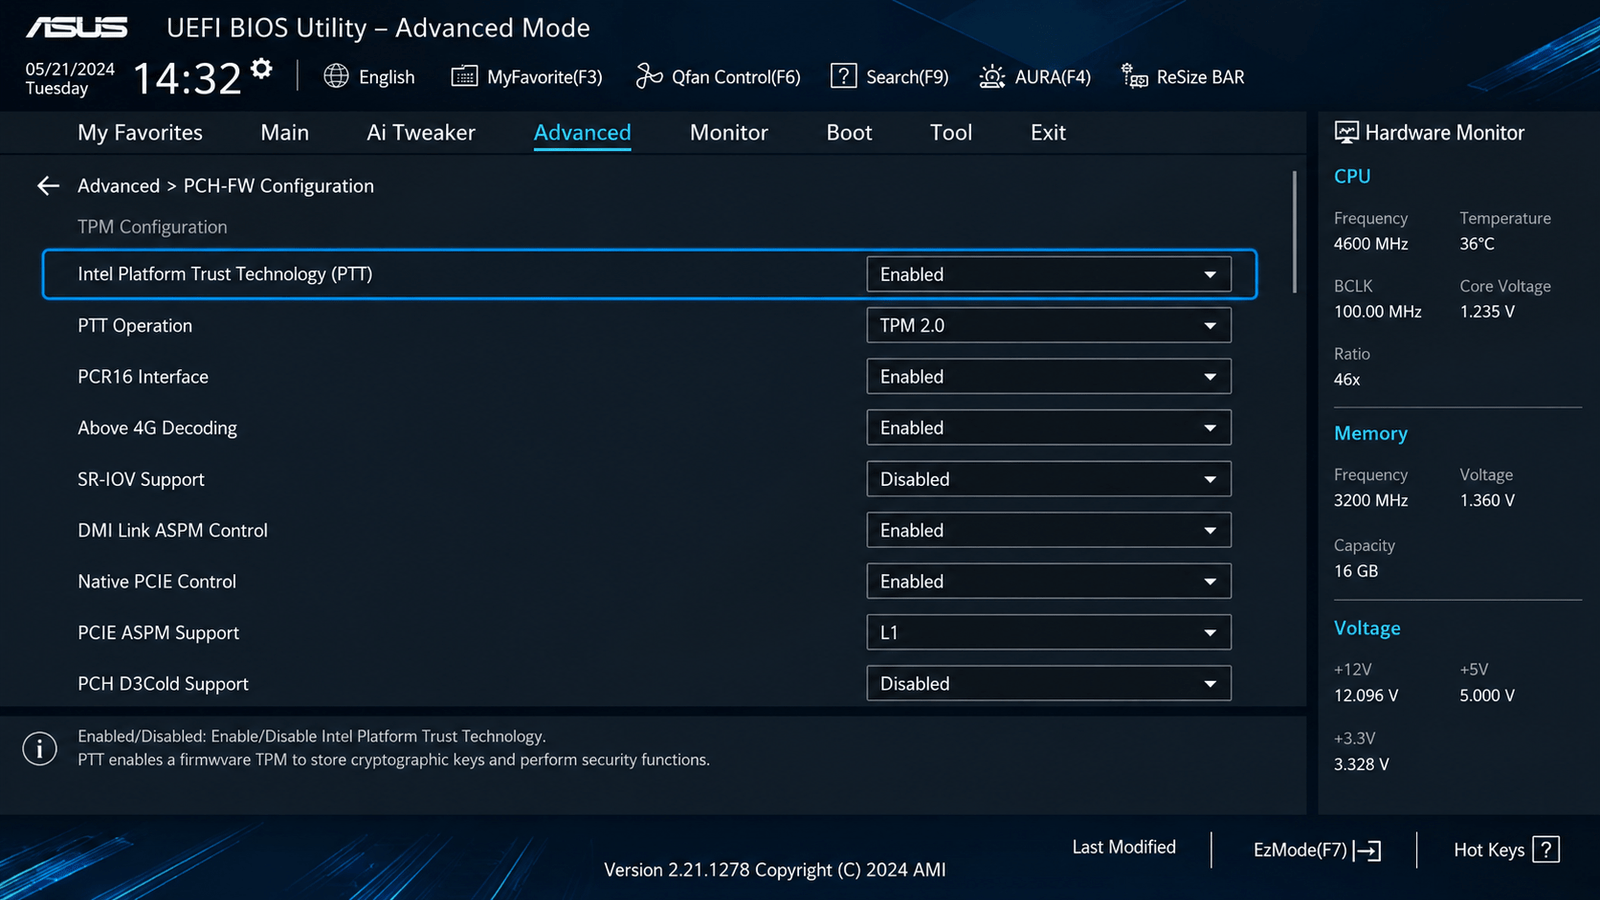
If you have ASUS motherboard which uses Intel as its processor follow these steps.
Set Intel PT Technology to ON.
You may see in some motherboards what appears to be called TPM Device Selection as a category. If it exists, choose the options that correspond to PTT or choose the option for Firmware TPM.
Intel PTT is the built-in firmware TPM provided by Intel, serving TPM 2.0 for Windows 11 and other security functions.
Step 4: Access AMD Systems
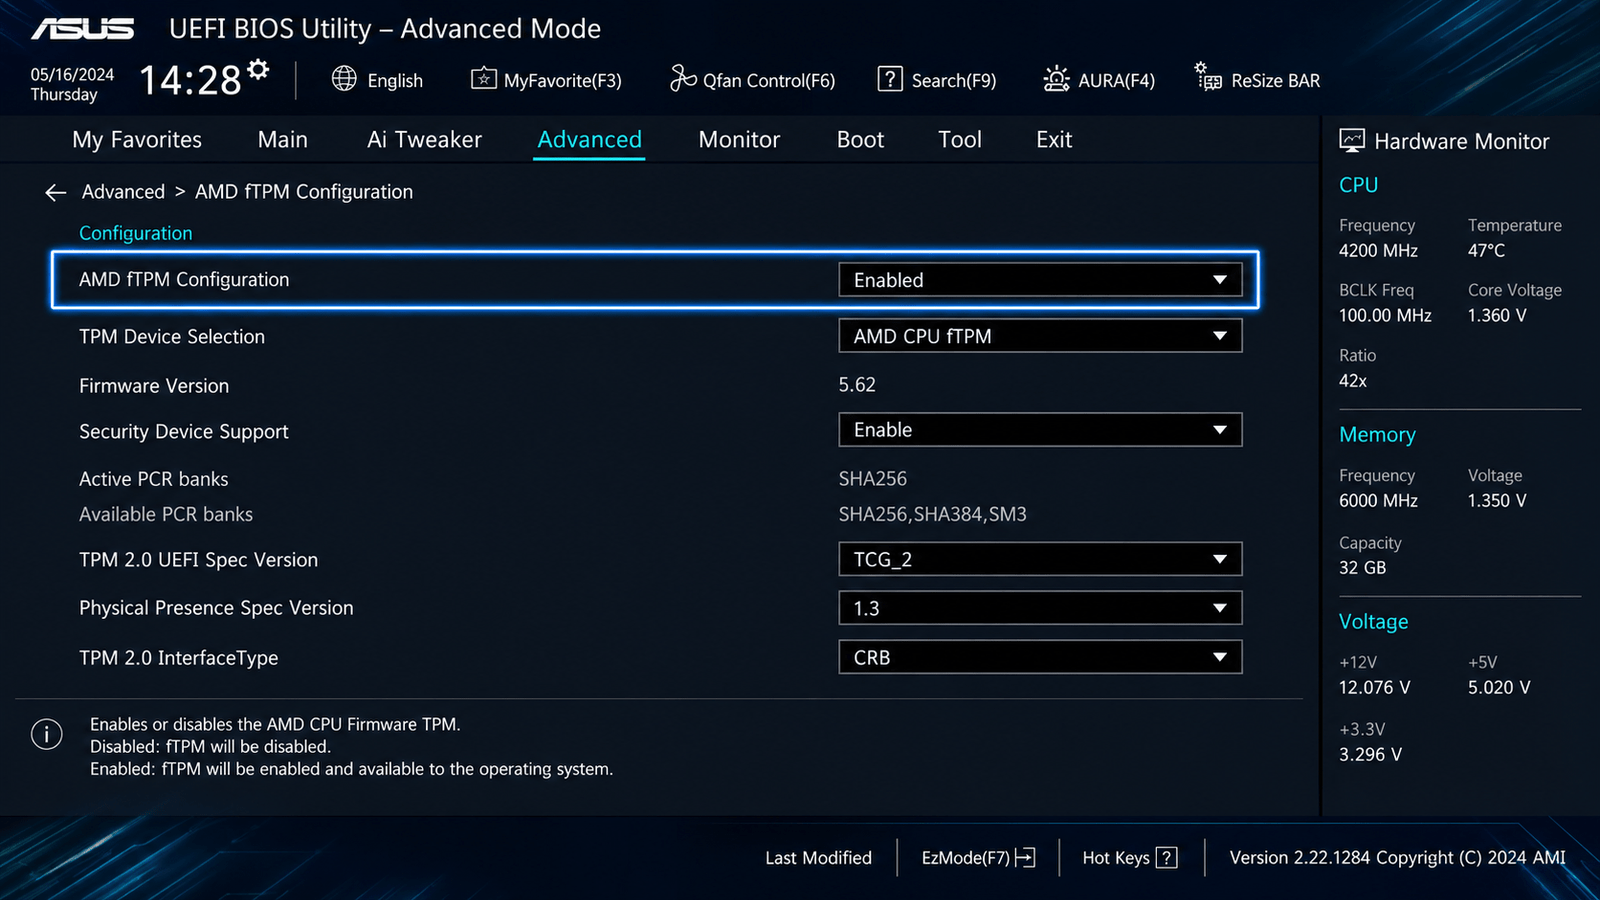
If your system is based on AMD, the most common access option is AMD FTPM or FTPM set to ON in the BIOS.
You may find some ASUS BIOS versions under Advanced or in the section concerning your CPU. Here, you may see AMD CPU fTPM. If you see that, set it to ON.
AMD FTPM is equivalent to Intel PTT.
Step 5: Save
Once you enable the respective option as described for your motherboard:
- Press the F10 key and note all your changes
- Above it select the Save & Reset option or Yes
- Your system will reboot.
Step 6: Confirm the Enablement of TPM 2.0
Once you boot Windows:
- Press the Windows and the R key together
- At the command prompt, enter the tpm.msc command.
- Then press return and/or enter the command
- The TPM is Ready to Use and will specify that you have version 2.0.
Common ASUS BIOS Paths for TPM Settings:
ASUS has many series of motherboards which can confuse beginners as their BIOS layout can differ. Here’s some of the common paths for the configuration of TPM:
For Intel ASUS Boards
- Advanced > PCH-FW Configuration > PTT
- Advanced > Trusted Computing > Security Device Support
- Advanced > Platform Trust Technology
For AMD ASUS Boards
- Advanced > AMD fTPM Configuration
- Advanced > Trusted Computing
- Advanced > CPU Configuration > fTPM
The wording may differ but can you see the following terms in the BIOS:
- TPM
- PTT
- FTPM
- Trusted Computing
- Security Device Support
What if the TPM Setting is Not Present?
There are many reasons why a user may not see the TPM setting.
1. Your BIOS May Have to Update Your BIOS
Older versions of BIOS may not show the TPM setting as clearly. BIOS may have older implementations for TPM. Check the ASUS support page with your motherboard model to see if there is a newer version of the BIOS.
2. EZ Mode is Selected
Some users do not leave EZ Mode and do not go to Advanced Mode. Always press F7 and see the advanced menus.
3. Limited Support from Your CPU or Board
Your CPU or motherboard may not support fTPM and in this case you may have to purchase a modular TPM if your motherboard supports one.
4. Your Settings May Be Hidden
ASUS can differ in their layouts for BIOS a configuration. Check your motherboard to see if Trusted Computing is there and see PCH-FW Configuration.
5. CSM or Legacy Options May Alter Visibility
Although Windows may operate in Legacy Mode in certain scenarios, there may be limitations in compatibility. Legacy Mode for Windows may be corrected by UEFI. This may be the case preparing for Windows 11.
Is Secure Boot Also Required?
If your BIOS Windows 11 with the ASUS instruction for enable TPM 2.0, then the answer is yes, along with Secure Boot.
Secure Boot is in its own right, an important and valuable requirement for Windows 11 along with TPM 2.0.
Verifying Secure Boot with ASUS BIOS
- Access BIOS
- Select Boot tab
- Identify Secure Boot
- Verify that it is Enabled
If TPM 2.0 is set, however, Secure Boot is set to Disabled, there may be limitations in compatibility checks for Windows 11.
Practical Example: Everyday Modern ASUS User
If your computer is an ASUS TUF Gaming motherboard with an intent to install Windows 11, the compatibility tool stating it does not meet the requirements. check in the Windows search for tpm and check, it says no compatible TPM.
Going into BIOS by pressing Delete will restart your computer. Once there, the BIOS will check if it is in EZ Mode, and if it is, set it to Advanced Mode by pressing F7 Once then, PTT inside PCH-FW Configuration is set to Enabled. It is set, and the computer is restarted by pressing F10 to set the changes in the BIOS.
The TPM is now set, it is in Windows, it is near for the Windows 11 check, and the check is passing.
Once you know what you’re working with, issue resolution becomes interestingly easy.
What You Need to Know When Changing Your BIOS
Changing BIOS settings is simple enough if you know what you’re doing, so follow these guidelines to avoid making mistakes:
Don’t Change Things Unless You Have to
If you’re figuring out how to enable TPM 2.0 in BIOS ASUS, doing what is needed, and what is necessary, would be limiting your changes to the TPM setting.
Take Note of What Things Used to Be
If unsure, snap a quick picture of the BIOS screen. You can revert changes later.
Update Your BIOS
Updates help with stability, compatibility, and security.
Check the Motherboard Manual
The manual can help you locate settings that you’re looking for in the BIOS.
Allow Your System to Boot Normally
Once you’ve enabled the TPM setting, you can then allow the system to boot normally and check the result from Windows.
TPM 2.0 and ASUS Troubleshooting
TPM being enabled in the BIOS is not always clear in an issue. This is a breakdown of some popular common issues and how to troubleshoot them.
TPM is Enabled in BIOS, But Not in Windows
- Restart the computer
- Use the TPM msc command to check
- BIOS and chipset drivers need to be updated
Windows 11 Still Indicates a Missing TPM
- TPM 2.0 needs to be confirmed
- Make Sure Secure Boot is Enabled
- Set the mode to UEFI and not Legacy or CSM
Missing TPM After BIOS Reset
If you reset your BIOS to its default settings, you enable TPM again.
BitLocker and Security Warnings
One of the risks that can come with changing security settings while using BitLocker is the reappearance of recovery prompts. If BitLocker is active, is back up your recovery key prior to changing your BIOS.
Which ASUS Motherboards Have Support for TPM 2.0?
Almost all of the recent ASUS motherboards have direct support for TPM 2.0. These include the:
- ASUS Prime
- ASUS TUF Gaming
- ASUS ROG Strix
- ASUS ProArt
- ASUS WS series
For a recent ASUS motherboard, the possibility of supporting firmware TPM is fairly high. However, this support is based on the motherboard model and the version of BIOS.
Conclusion
Wondering how to enable TPM 2.0 in ASUS BIOS is normally easier than expected. You can usually access the BIOS of your motherboard, enable the advanced settings, and find the settings related to TPM and turn on Intel PTT or AMD fTPM.
After the processes mentioned above, TPM 2.0 is used to enhance the security of your system. You can also run BitLocker and install Windows 11 and Windows 10 on your system. Just verify that TPM 2.0 is installed by running tpm.msc command in Windows and install secure boot if necessary.
For users of ASUS, TPM 2.0 is one of the changes that are worth the effort of changing the BIOS.

